If your calves feel like overcooked rubber bands after a run and your hamstrings are still pulling two days later, you are not alone. Post-run tightness in the lower legs is one of the most common complaints I hear from runners at every level, from people logging three miles on Tuesday nights to folks training for half marathons. The problem is rarely lack of effort. It is usually a matter of doing the wrong recovery steps, or skipping recovery entirely because stretching feels awkward and foam rolling takes up half the living room floor.
A muscle roller stick changes the math on that. It takes about six minutes, requires zero floor space, and you can use it right after you get back through the door while you are still in your shoes. I have been recommending the Idson Muscle Roller Stick to the runners I work with for months now, and the feedback has been consistent: calves feel looser faster, and the second-day soreness that used to linger through the work week starts to fade quicker. This guide walks you through the exact protocol I give my clients, step by step.
Your calves are tight right now. Here is the stick that makes the fastest difference.
The Idson Muscle Roller Stick has 4.5 stars from over 26,000 runners and athletes. Compact enough for a gym bag, firm enough to actually move tissue. Check today's price on Amazon before you read the next section.
Amazon Check Today's Price on Amazon →Why Calves and Hamstrings Lock Up After Runs
Before we get into the steps, it helps to understand what you are actually dealing with. During a run, your calves contract hundreds of times per mile to propel you forward and absorb impact at landing. Your hamstrings fire hard on the push-off phase and decelerate your leg on the swing. By the time you stop, both muscle groups are shortened, fatigued, and holding residual tension they did not fully release during the run itself.
That tension does not go away on its own quickly. Blood flow slows once you stop moving, waste products from muscle contraction sit in the tissue, and if you sit down at a desk or get in a car right after your run, the muscles cool in that shortened state. That is what creates the stiffness you feel two hours later or the next morning. Rolling with a stick applies direct mechanical pressure to the muscle belly, helps move fluid through the tissue, and encourages the muscle to lengthen out of that contracted state. It is not magic. It is just physics, applied consistently.
Step 1: Time It Right and Set Up Your Position
The best window for rolling is within fifteen to twenty minutes of finishing your run, while your muscles are still warm. Warm tissue responds better to pressure than cold tissue, and you will need less force to get the same release. If you wait until after a shower or after sitting down for dinner, you will need to use more pressure and you will get less benefit for the same amount of effort.
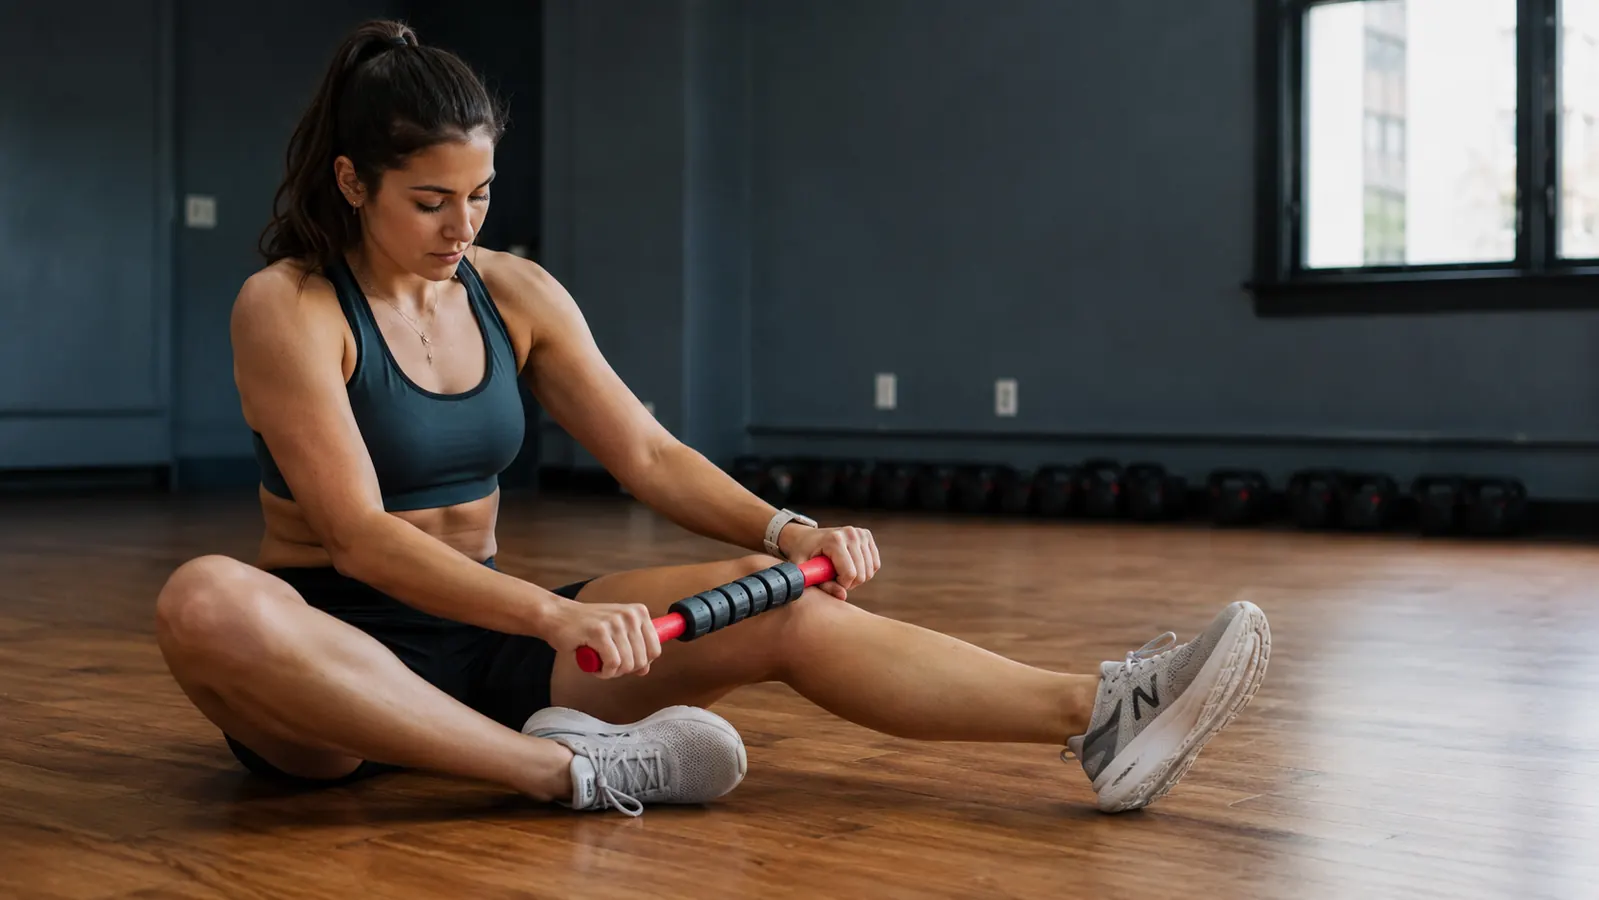
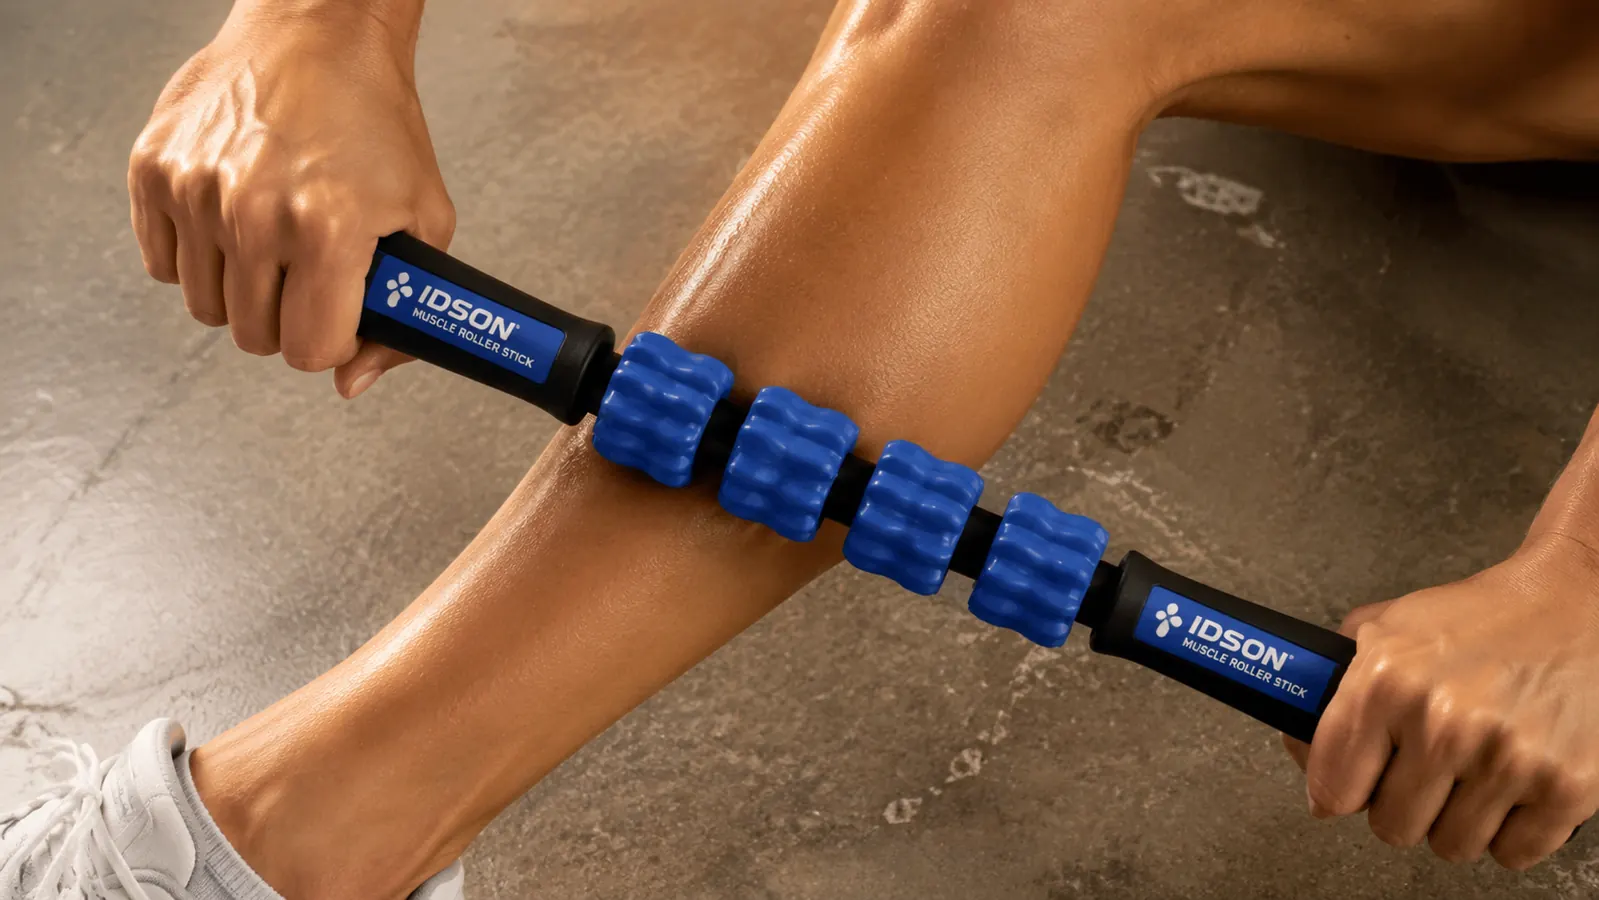
For calves, sit on the edge of a chair or a low bench with one leg extended straight in front of you, heel resting on the floor. Place the roller stick across the back of your lower calf, just above the Achilles. Both hands grip the handles of the Idson stick with a firm but relaxed grip. Your leg should be as relaxed as possible. The more you tense up, the less the rolling accomplishes because you are just rolling over contracted muscle instead of flushing through it.
For hamstrings, stay in the same seated position but move the stick up to the back of your mid-thigh. Keep the leg relaxed and let the weight of the stick do some of the initial work before you add downward pressure.
Step 2: Start at the Base of the Calf and Work Up in Passes
Begin at the base of the calf, right above the Achilles attachment point. Apply moderate downward pressure and roll slowly upward toward the knee in a smooth, even stroke. The full pass from base to just below the knee should take about three to four seconds. Do not rush it. A lot of people roll fast when they hit a tender spot because it hurts less, but that fast rolling mostly just slides over the tissue without changing anything.
Do five to six slow upward passes on the back of the calf. Then rotate your leg slightly inward and do another four to five passes to catch the inner calf belly, which is one of the spots runners most consistently miss. Then rotate slightly outward and repeat on the outer edge. You are covering the gastrocnemius and soleus in three angles, which gives you much more complete coverage than just rolling up the center line.
When you hit a spot that makes you want to flinch or hold your breath, pause there for a count of five. Hold the pressure steady without pushing harder. Let the tissue respond. Then move on. Forcing extra pressure into a tight knot usually just creates more guarding tension, not release.
The goal is not to hurt yourself into recovery. It is to apply enough pressure that the muscle notices and lets go. If you are gritting your teeth the whole time, you are pressing too hard.
Step 3: Move to the Upper Calf and Soleus
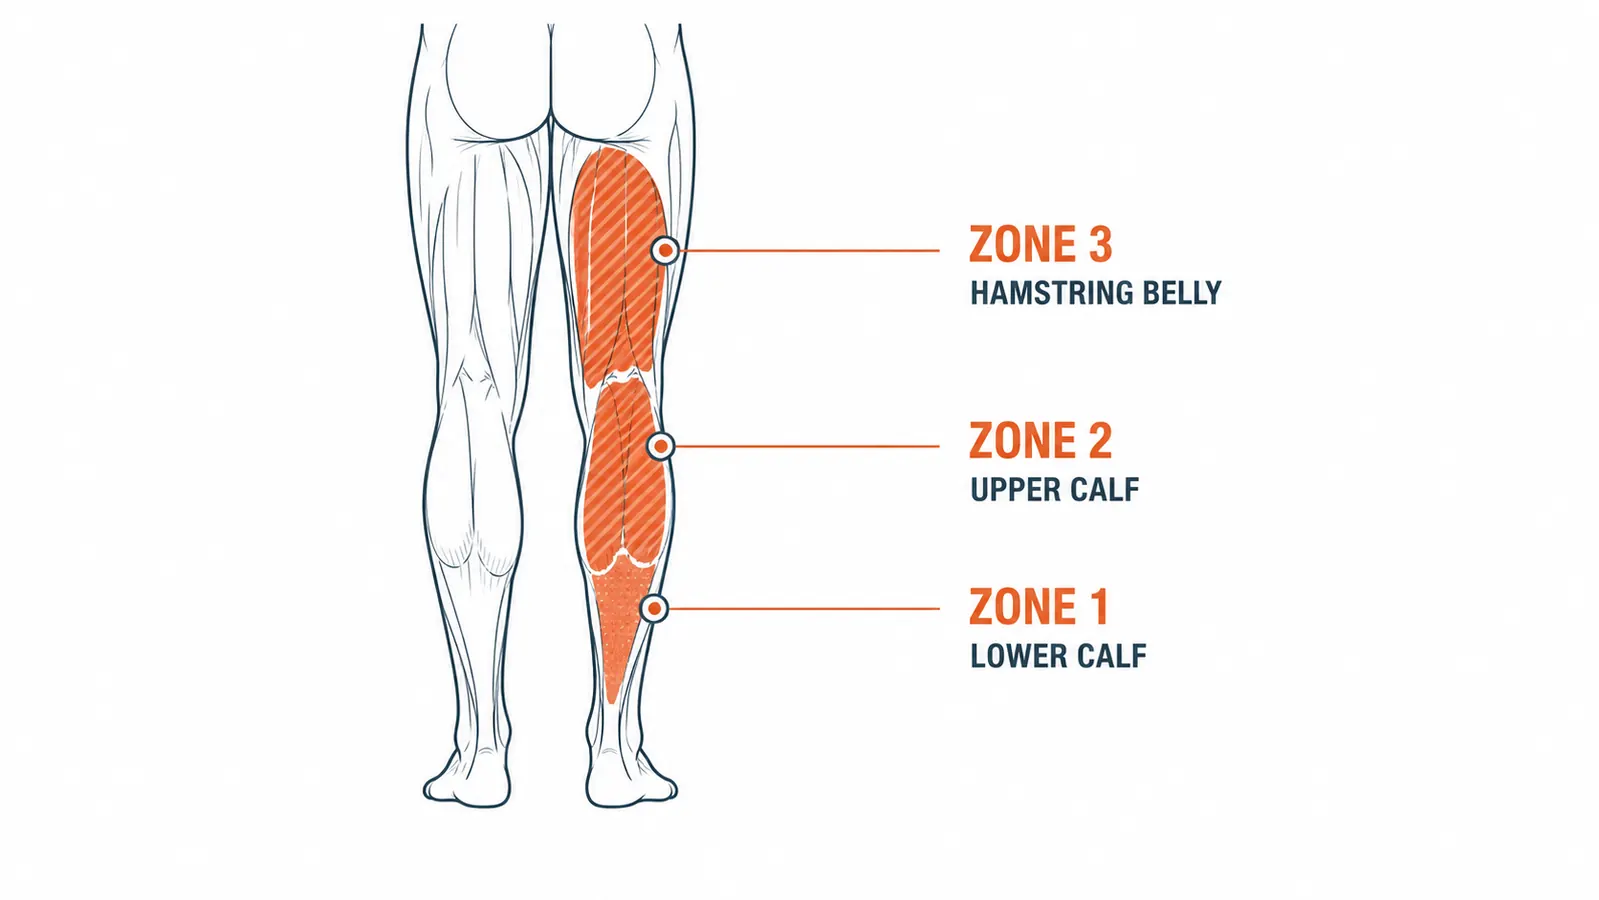
Runners tend to focus on the meaty belly of the calf and ignore the upper portion, right below the back of the knee. That area, where the calf transitions into the popliteal space, is often where the actual tension is anchored. Moving the stick up to that zone and doing four to five slow passes can release a surprising amount of holding that you would not have found by just rolling the lower belly.
The soleus sits underneath the gastrocnemius and is harder to reach with light pressure. To get into it, bend your knee about thirty degrees while rolling. With the knee slightly bent, the upper gastrocnemius goes slack and the roller can sink deeper into the underlying soleus tissue. This is especially useful if your calves feel tight even after standard rolling because standard rolling was not reaching the right layer.
Spend about ninety seconds on the upper calf and soleus per leg. It is a smaller zone and does not need the same number of passes, but it is worth not skipping.
Step 4: Shift to the Hamstrings
Move the stick from the back of the knee up to the mid-thigh. The hamstrings are a larger muscle group with more surface area, so you will need to work in sections rather than doing one long pass from knee to glute. Divide the hamstring into a lower half and an upper half.
Start with the lower hamstring, just above the back of the knee. Roll slowly upward to mid-thigh, using moderate pressure and taking three to four seconds per stroke. Do six passes. Then move the stick to mid-thigh and work up toward the top of the leg, just below the glute. Another six passes. For runners, the lower hamstring tends to hold more tension because it works hard during the push-off phase. For desk workers who also run, the upper hamstring near the sit bone is often where the chronic tightness lives.
If you feel a cordlike band of tension rather than generalized soreness, you have probably found a fascial restriction or adhesion. Use the same pause technique from the calf work: hold steady pressure for a five-count, then continue your pass. Do not saw back and forth over the same tight spot quickly. That friction can irritate the tissue rather than release it.
The full hamstring session per leg should take about two minutes. Thorough but not exhausting.
Step 5: Finish with a Short Static Stretch and Hydration
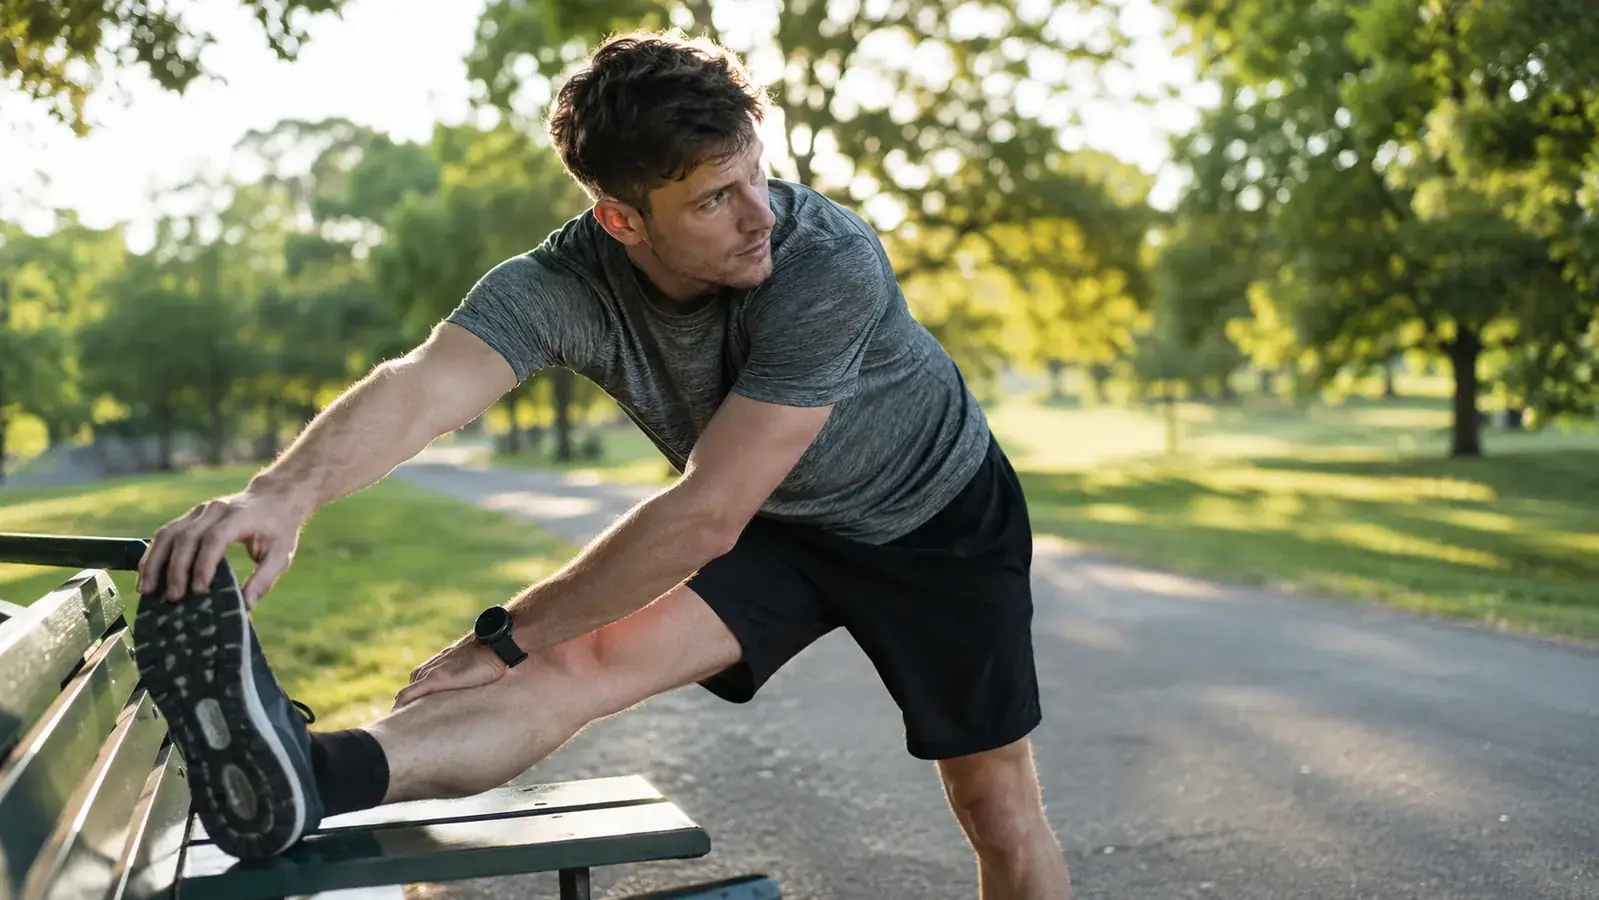
After rolling, the muscle is more pliable and receptive to lengthening than it was before. This is the best time to do a short static stretch, held for thirty to forty-five seconds, not the quick ten-second stretch most people do and call it done. For the calf, stand facing a wall, step one foot back, keep the heel flat on the floor, and lean forward until you feel the stretch in the calf belly. Hold it. Do not bounce. For the hamstring, sit back on the edge of your chair, extend one leg with the heel on the floor, and hinge forward from the hip with a flat back until you feel the pull in the back of the leg.
Drink water before and after the session. Rolling mobilizes fluid in the tissue, and being hydrated makes that process more effective. It does not have to be a complicated hydration protocol. Just a full glass before and a full glass after.
The whole protocol, both legs, calves and hamstrings, capped with the stretches, takes about ten to twelve minutes. That is a reasonable commitment for a meaningful reduction in next-day soreness and a lower likelihood of the cumulative tightness that leads to strains over a full training cycle.
What Else Helps
Rolling is the most direct tool for post-run tissue recovery, but it works best as part of a slightly larger routine. Elevation for ten to fifteen minutes after a long run helps clear fluid from the lower legs and reduces the swelling that makes calves feel thick and stiff. A warm shower after rolling keeps the tissue loose and extends the window of pliability. On really hard training days, a second brief rolling session the following morning, before the tissue has fully stiffened up overnight, can noticeably cut the second-day soreness that otherwise would have peaked mid-morning.
If you are also dealing with foot tightness or plantar tension after runs, consider adding a lacrosse ball for the arch and heel. The roller stick handles the long muscle bellies well but cannot get into the small structures of the foot the way a firm ball can. These tools complement each other rather than compete.
For runners dealing with persistent hamstring tightness that does not respond to rolling alone, the issue is sometimes hip mobility rather than the hamstring itself. When the hip flexors are tight from prolonged sitting, the pelvis tilts forward and puts the hamstring in a perpetually lengthened and stressed position. If that sounds like you, adding a hip flexor stretch routine alongside your rolling work will do more than just rolling harder on the hamstring.
One thing I tell every runner I work with: consistency matters more than intensity here. Five minutes of rolling every day after your run will do far more for you than one thirty-minute session once a week. The tissue responds to regular, moderate input. It does not respond well to occasional heroic efforts. Build the habit small and keep it simple.
For a deeper look at how the Idson stick holds up over months of real use, the long-term review covers durability, roller smoothness, and whether the handles stay comfortable after regular sessions. And if you want a broader map of where the stick is most effective beyond calves and hamstrings, the 10 muscle groups guide is worth a look before your next training block.
Six minutes after your next run could save you two days of walking stiffly.
The Idson Muscle Roller Stick is the tool I recommend for this exact protocol. It is firm enough to actually reach the tissue, small enough to keep in your gym bag, and priced so that it is not a debate. Over 26,000 athletes have rated it 4.5 stars. See today's price and decide.
Amazon Check Today's Price on Amazon →